
Editing an Active Campaign
Ways to make changes to a previously made campaign.
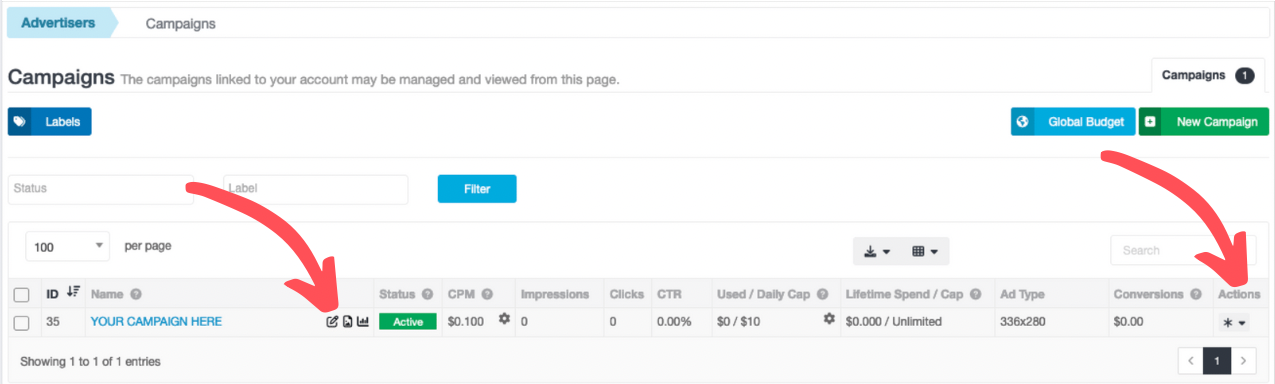
Campaigns Page
The campaigns linked to your account may be managed and viewed from this page.
Go to “Advertisers” from the main navigation menu.
From the drop down menu, select “Campaigns”.
You can view all your campaigns here
Quick Edits
Quick edit tools and useful information directly accessible on the Campaigns page.
Make a New Campaign
The number located at the top right shows how many active campaigns are on this account.
• You can create a new campaign by clicking the green “New Campaign” box underneath it.
Organize Your Campaigns
Alter what the chart displays.
• Filter campaigns by Status and/or Label(s)
• Located above the chart, next to the blue “Filter” button.
• Add Labels to campaign(s) for your organizational benefit.
• Select the check box to the left of the campaign(s)
• Click the blue “Labels” tag button in the top left to assign/create Label(s)
• Select “Apply”
• Selecting a chart title sorts the ad campaigns by ascending/descending of that title.
• Determine which columns are displayed by selecting the chart icon, located above the chart.
• Download the data as a CSV or JSON with the download icon above the chart.
Bulk/Batch Edits
Select multiple ad campaigns and make the same changes to all at once.
• Checkmark the campaigns you wish to edit. Color-coded options will appear above.
• Directly under the “Campaigns” title, there is a yellow “Edit CPM” batch option
• Three other boxes: Enable (green), Pause (yellow), and Delete (red) the campaigns
• You can also set a “Global Budget” at the top right which affects all active campaigns
Set the Global Budget to 0.00 to disable it
Edit a Campaign
Easily view or change a campaign’s CPM and Daily Budget.
• Edit the CPM rate by selecting the gear icon in that column, typing in an amount, then selecting “Save”.
• Edit the Daily Budget by selecting the gear icon in the Used/Daily Cap column, then selecting “Save”.
•Today’s use of the campaign’s Daily Budget is displayed under Used/Daily Cap
The system operates in UTC - when the daily budget resets at 0:00, it may still be the afternoon in your timezone.
• In the Actions “✱” drop down menu, you can: Start, Pause, or Delete a campaign. You can also access other actions to view/edit the campaign’s statistics and creatives.
• Selecting the “Duplicate” option from the Actions menu will create a copy of your campaign. All active and paused creatives will be copied to this new campaign. Select the green “Duplicate” box when done.
To access a campaign and its settings, either select it’s blue campaign name OR an icon shortcut.


Edit Icon

Creatives Icon

Statistics Icon
Campaign Overview Page
To view a more in-depth view of a campaign, select the campaign’s blue name. This will take you to its Campaign Overview Page.
At the top of this page, you can see the campaign’s Lifetime Spend, total Impressions, and total Clicks.
Below this is a chart displaying the last 7 days of activity. You can access Statistics page by selecting the blue statistics button on the right.
At the bottom of the Overview page there is a progression bar displaying the campaign’s Lifetime Spend and Daily Limit. Here you can also Pause/Enable the campaign by selecting the icon.
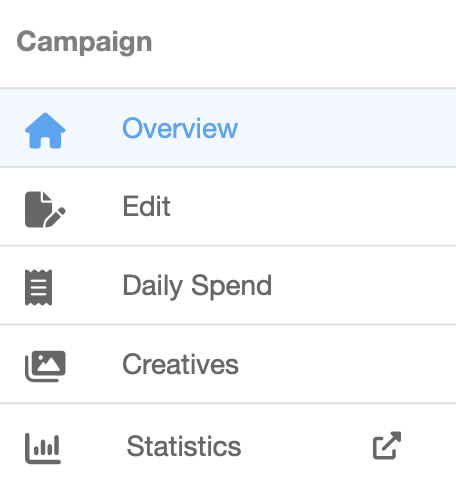
On the left hand side tab menu, you can easily navigate to the other pages for this campaign.
Edit Campaign Page
On the Edit Campaign page, you can edit:
• The Name your campaign
• Placements which pre-filter sources for your campaign
• The Bidding specifications
• Targeting by region, language, operating system, or device
• Scheduling settings of when to run your campaign
How to get there
Locate the ad campaign you wish to edit from the Campaigns page.
In the “Name” column for that ad campaign, select the campaign’s blue name or select the “Edit” icon. This will bring you to the Edit Campaign page.
Alternatively, select the “✱” in the “Actions” column for the campaign you wish to edit, then select “Edit”.
Daily Spend Page
The campaign’s daily spend snapshot displays a daily recap of spend, impressions, CPM, Clicks, and CTR.
Please keep in mind, the system operates and displays data in UTC - when the budget resets at 0:00, it may still be the afternoon in your timezone.
Campaign Creatives Page
On the Campaign Creatives page, you can:
• Add creatives from your Creatives Library by clicking the green “Add Creatives” box in the top right
• Pause/Resume/Delete Creatives in this campaign
• View Creatives' information including: Lander, Weight, Impressions, Clicks, and CTR
• Navigate to the Overview, Edit Campaign, Creatives, and Statistics pages via the sidebar menu
Lander and Weight can be directly edited from here.
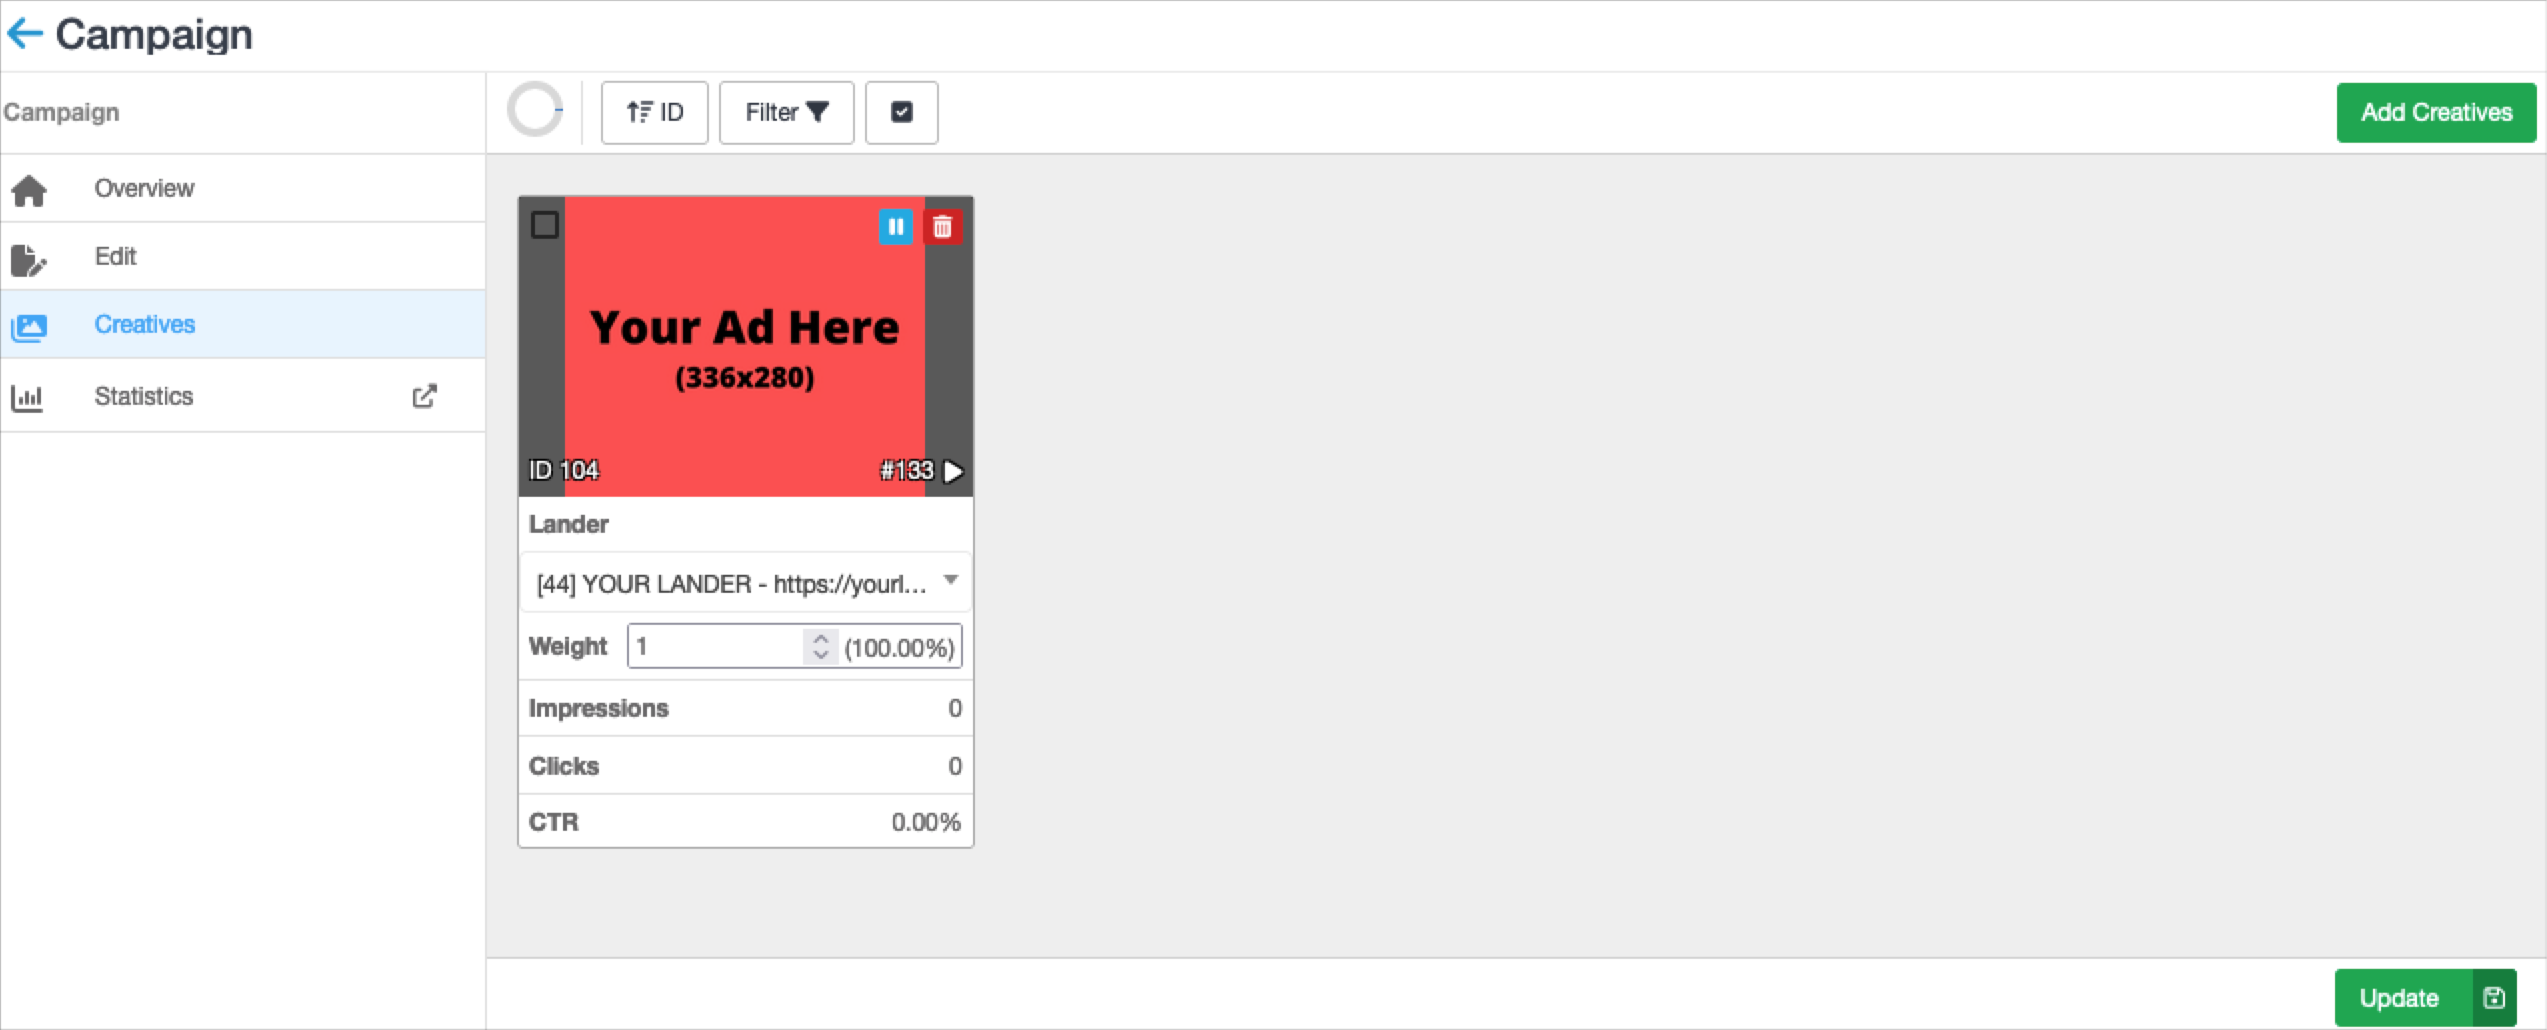
Select the green “Update” box at the bottom of the Campaign Creative page to save changes.
How to get there
From the Campaigns page, locate the ad campaign you wish to edit the creatives for.
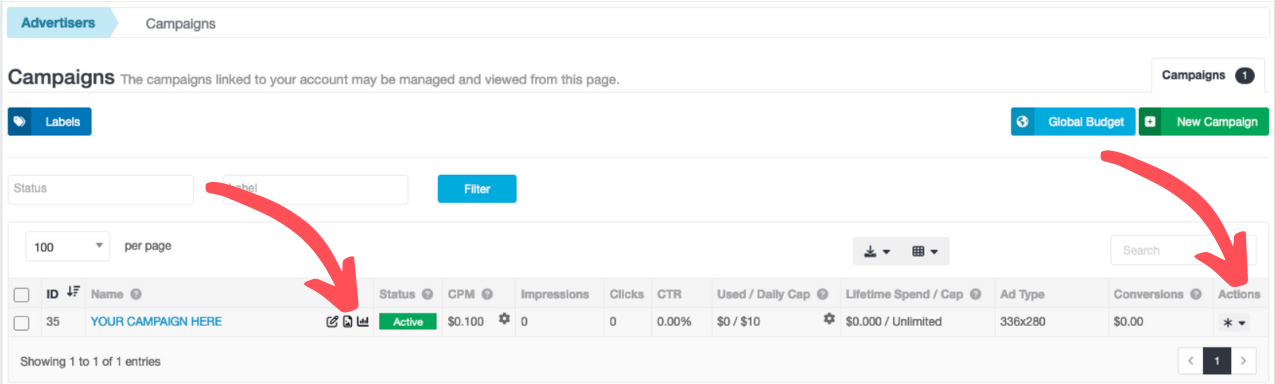
In the “Name” column for that ad campaign, select the “Creatives” icon. This brings you to the Campaign Creatives page.
Alternatively, under the “Actions” column, select the “✱” to open the drop down menu of the campaign you wish to edit, then select “Edit Creatives”.
Statistics Page
View an ad campaign’s statistics by selecting the graph icon next to the campaign’s name, or by accessing the Actions drop down menu, “✱”, and selecting “Statistics”.
Statistics data here will only pertain to the specific campaign - as displayed by the title.
Edit From Creatives Library
Editing creatives in your Creative Library can affect an active campaign. You can also add or link creatives from your Creatives Library to an active campaign.
Click here to find out how to edit creatives From the Creatives Library.
Edit Landers
Landers or landing links are where visitors are routed when they click on an ad. Editing landers will affect all creatives and ad campaigns they are associated with.
To view all landers linked with your account, go to “Advertisers” from the main navigation menu, and select the “Landers” drop down option.
Landers Page
Add a new lander by selecting the green “Create” box in the top right, completing a New Lander Form, and then selecting “Save”.
Selecting a lander opens an edit menu at the bottom. In this edit menu, you can:
• Pause, Enable, or Delete a lander
View and edit a lander’s details by selecting the gear icon beside that lander.
Here, you can:
• change the name of the lander
• change the landing page URL
• edit/add Query Params and Macros to your URL
Edit White/Black Lists
To view and edit all Whitelists and Blacklists being utilized by your ad campaign(s), go to “Advertisers” from the main navigation menu, and select the “White/Black Lists” drop down option.
White-lists will consist ONLY the selections while black-lists REJECT the selections.
Setting a White/Black list is optional. If you do not specify your Placement settings, your campaign will run in all available and compatible Zones.
Adding White/Black Lists
Create a new targeting list (whitelist or blacklist) for a campaign and determine where your ad campaign will run. This can also be done in the process of creating a new campaign.
Add a new list by selecting the green “Create New” box in the top right and completing a new White/Black List Form.
• name the new list
• determine the functionality of this list
• add a site or domain ID by searching and selecting “Add Site” or via “Manual import”
• Select “Submit” when complete
Ads can only be displayed in compatible Zones. Each Zone’s “location” is described by its title and description.
There are two different ways to edit a campaign’s White/Black list:
Edit from your Campaigns Page for editing an already existing white/black list:
Select “Campaigns” from the main navigation menu
Select the “edit” icon OR the Actions “asterisk” to the very right and select “edit”
Under “Placements” select the green “Edit” box next to White/Black List (opens a new tab)
Scroll and select your Zones and select the green “Update” box at the bottom (you can close this tab now)
Done!
Edit from White/Black List Page to make a new and/or edit a white/black list:
Select the “White/Black Lists” dropdown from the main navigation menu
Select the list that you wish to edit or “Create New” in the top right
Name the list and/or edit the list by searching for the site, “add site”, select your Zones
Select the green “Submit” box
If you edited a Whitelist already linked to a campaign, you are done!
If you created a new White/Black list, you have to apply it:
Apply a new White/Black list by selecting “Campaigns” from the main navigation menu
Select the “edit” icon for the campaign OR the Actions “asterisk” and “edit”
Under “Placements” select a White/Black list from the dropdown options
Select the green “Update” button
Done!